Tamales from start to finish!
This recipe uses dried corn husks for wrappers. Other tamales may use fresh corn husks or large tropical banana leaves. Dried corn husks can be found at specialty markets or on the internet. I purchased mine from Broward Meat And Fish Company in the Fort Lauderdale area.
Tamale fillings are made of three components:
- The first component is masa, a dough made of fine ground corn meal and water. It is essentially, the same dough used to make corn tortillas. It can be made, easily, from scratch or it can be purchased from specialty markets. For more flavor, the water can be replaced with chicken or vegetable broth, milk or a combination.
- The second component is made by combining masa with lard or shortening, salt and baking powder. The lard is whipped for at least five minutes or until it is light and fluffy like cake frosting. The salt and baking powder is added to the whipped lard. Then, while the electric mixer is running, small handfuls of masa dough are added to the lard, mixing thoroughly before adding more masa. After it is all mixed, it is beaten for another 10 minutes to insure tender tamales. Don’t worry if it seems like the recipe calls for a lot of lard/fat. A lot of the fat renders out into the steamer water while the tamales steam.
- The third component is the filling within the filling. This is where your own creativity comes into play. You can stuff them with cheese, peppers, shredded chicken or pork or any combination.
While preparing the fillings, soak the dried corn husks in water until ready to fill.
For the masa:
- 1 pound instant or pre-cooked fine ground corn meal (about 2 cups)
- 1 1/2 cups milk
- 1 15 ounce can white hominy and the packing liquid
- 1 teaspoon cumin
- 1 teaspoon ancho chili powder or regular chili powder
- 1 cup chicken broth
- flour for dusting counter top while kneading dough
In a sauce pan over medium-low heat, simmer the milk, hominy, hominy liquid, cumin and chili powder. Simmer for about 10 minutes. Let cool and using a blender, blend until smooth.
In a large mixing bowl, combine the corn meal, milk mixture and chicken broth. Mix until everything is incorporated. Dump the dough onto a clean floured counter and, using your hands, lightly knead for 2 to 3 minutes. The dough should be fairly wet. You want it dry enough so it just barely quits sticking to your fingers. Add more corn meal or more liquid to achieve this consistency. Let the masa rest for about an hour before combining with the lard.
For the tamale filling:
- 1 batch masa as described above
- 1/2 pound lard (about one cup)
- 2 teaspoons baking powder
- 2 teaspoons salt
Using an electric mixer, whip the lard for about 5 minutes or until light and fluffy. Add baking powder and salt and mix until incorporated.
While mixer is running, add small handfuls of masa to the lard and continue beating until incorporated. Continue adding masa until it is all incorporated. Continue beating for another 10 minutes to insure light, tender filling.
A few points about the corn husk wrappers. They will not be uniform in size. They are shaped, roughly, like a triangle. You will have a square of filling, measuring about 4 inches by 4 inches, so you will need edges on the husk free of filling so the husk can be rolled around the filling. For this much filling, the ideal sized husk will be 7 or 8 inches wide at the widest end and about 10 inches tall, from the widest end to the narrow end. Husks larger than this can be torn to more closely fit these measurements. Save the torn scraps for tie strips. Put the scraps back into the soaking water, so they don’t dry out. If you run out of wraps that are large enough, reduce the amount of filling and make smaller tamales.
Take a single corn husk out of the soaking water and pat dry with a paper towel or clean cloth. The corn husks will be shaped sort of like a triangle. Lay the husk on the counter with the narrow end away from you, the wide end close to you. Spread 1/4 cup of filling into a 4 inch by 4 inch square toward the wide end of the husk. Leave a border, free from filling of about 2 inches on the wide end and about and inch along both long sides of the husk. This should leave you with about 3 or 4 inches free at the top of the husk, the narrow end.
Smooth the filling, using a rubber spatula.
For the stuffing:
- 1/4 pound Queso Fresco Cheese (fresh white Mexican Cheese), cut into thin sqaures about 2 inches by 2 inches
- Roasted Red Bell Peppers – Jarred, Cut into chunks/strips about 2 inches by 2 inches
After smoothing the masa/lard filling onto the corn husk, lay a piece of cheese and some red pepper in the center of the filling.
To roll the tamale, lift the two long sides up, press them together and roll them both in the same direction around the filling. I found that, usually, when I lifted the two sides up, I could slip one side in and under the edge of the filling. That way, I could make a nice snug tube with the sides rolled around each other. Once you get the hang of it, it goes quickly and easily.
After you have rolled the sides around the filling, creating a tube, with the wide end at one end and the narrow end at the other end of the tube, fold the the narrow end back and toward the wide end. Tie the tamale with a thin piece of husk torn from one of the scraps. You will now have a package that is open on the wide end, folded over in the middle and secured so no filling can come out of that end.
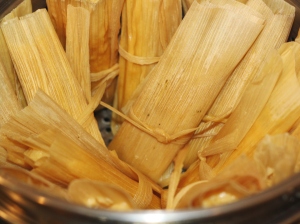
Arrange the tamales on end, in a steamer basket with the folded end facing down and the open end facing up. Fill the basket with enough tamales so that they can’t fall over and lose the filling.
Put enough water in the bottom of the steamer to come just below the steamer basket. Bring the water to a boil, then place the steamer basket in, over the boiling water and cover the steamer with a tight fitting lid or with tin foil. Reduce the burner to medium or medium high. You want the water to continue to boil, but not so hard that it boils away too quickly. Steam the tamales for 1 and 1/2 hours. Check the water level periodically and replace with more boiling water as needed. Don’t re-fill with water that is not boiling.
Remove one tamale and test for firmness. I found mine to look pretty wet, when I checked on them after an hour and a half. I turned the burner off and left the lid off so they could cool slightly. They firmed up beautifully while resting for about half an hour.
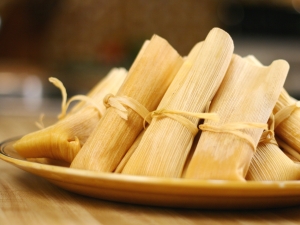
Serve the tamales on a large platter, family style and let each guest open their own tamale package.
I know it all sounds complicated, but once you get through it the first time, you will see that it is really very easy, and the payoff is huge! I can’t wait to try some more exotic fillings, like shredded chicken or pork braised in spicy tomato sauce. Yumm!

